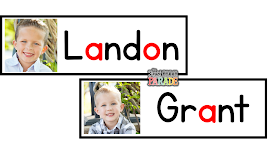
In yesterday's post, I added this little picture of an example of what my name cards look like that I add to my Word Wall and use for various name activities at the beginning of the year....
 A few of you said you didn't know how to make that in Power Point and wanted to know how it was done, so I put together this little tutorial and I hope it helps you out!!!
I forgot to mention that I used KG PRIMARY PENMANSHIP as my font for these name cards.
I do hope this helps to clear up any questions you had about creating name cards in Power Point. I've been using PP for the last 10 years because it's the easiest for me to use. There are probably a million different ways to do this on a million different platforms, but this is what works for me :)


Thank you, this is really helpful!
ReplyDeleteAwesome! Thanks!
ReplyDeleteThanks! I made mine but I turned them and put three on a page. Can't wait to get them up on the word wall!
ReplyDeleteYour boys are adorable!!
ReplyDeleteLove it.
ReplyDeleteLove this idea.
ReplyDeleteSheri
http://earlyyearswithsheri.blogspot.com.au/2014/09/halloween.html?m=1
Bless you for taking the time to share this with us. Yay!
ReplyDeleteVery cute! I love that the vowels are a different color too.
ReplyDeleteLovely Idea,thanks for sharing,you may also visit this
ReplyDeleteFree Online Preschool Education
Thanks so much for sharing this tutorial. I have already created these for my students. I am going to place them in my writing center for students to refer to when writing journals so they can include their friends names. I love that you did the vowels in a different color. Great idea!
ReplyDelete